Are you tired of looking at that cracked, rotting window sill? You’re not alone. Many homeowners face the challenge of maintaining their window sills to keep their homes looking good and functioning well. Window sills are not only aesthetic features but also provide structural support and weatherproofing. Replacing them doesn’t have to be daunting. In this guide, we’ll walk you through everything you need to know about how to replace a window sill, ensuring both practical and beautiful results, including:
- Understanding the Importance of Window Sills
- Preparing for the Replacement
- How to Replace a Window Sill in 7 Steps
- Maintenance Tips for Longevity
🤔 Understanding the Importance of Window Sills

Window sills play a vital role in both your home’s exterior and interior. They offer more than just a place to rest a flower pot. Window sills help prevent water ingress, which can lead to severe damage over time. They also add an extra layer of insulation, helping to keep your home energy-efficient. A well-maintained window sill enhances curb appeal, making your home look inviting and well-cared-for.
Neglecting window sills can result in larger issues, such as structural damage or increased energy bills. It’s crucial to address any signs of wear and tear promptly. Understanding these roles underscores why replacing a damaged sill is a beneficial home improvement task.
Signs Your Window Sill Needs Replacement
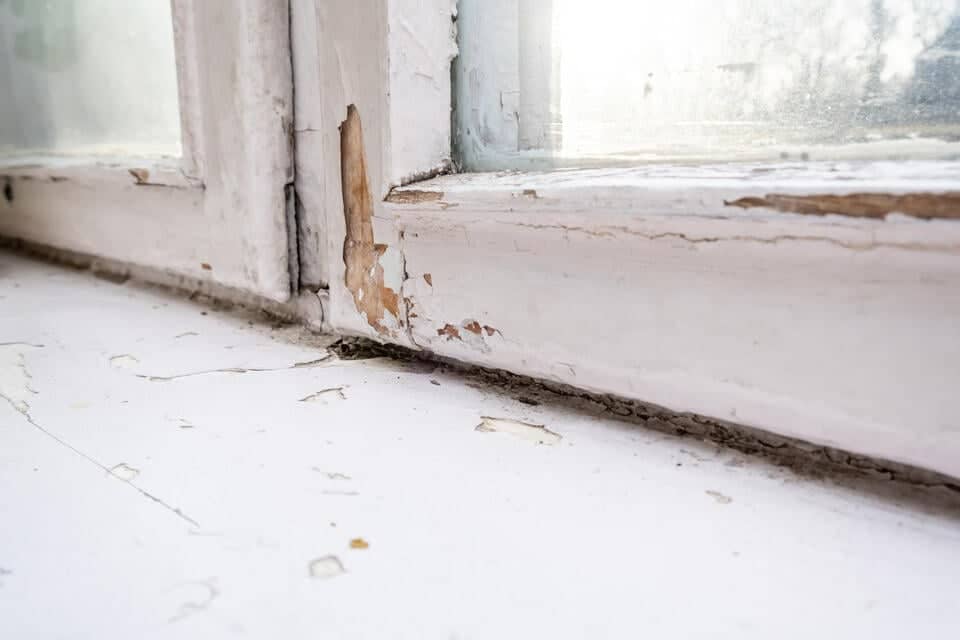
Identifying when your window sill needs replacing can save you from more significant repairs down the line. Look for the following signs:
- Visible cracks, indicating structural weakness
- Discoloration or peeling paint, which may suggest moisture issues and rot
- Soft or spongy wood, a strong sign of rot that needs addressing
- Drafts around the window, indicating improper sealing against the elements
Regularly inspecting your window sills helps catch these issues early, making the replacement process smoother and less costly.
🧰 Preparing for the Replacement
Preparation is key to a successful window sill replacement. Start by clearing the area around the window, removing any decorative items or curtains. Protect your flooring with a drop cloth, as the removal and installation process can be messy.
Next, inspect the surrounding window frame for additional damage that might need addressing. Removing any old caulk or sealant is crucial for a clean fit for the new sill. Once prepared, your workspace will be ready for the main task without unnecessary interruptions.
Tools and Materials You’ll Need
Before you begin the replacement process, gather all necessary tools and materials. Essential tools include:
- A pry bar for removing the old sill
- A saw for cutting the new sill to size
- A hammer and nails or screws for installation
Materials will vary based on your choice of new sill, but you’ll typically need:
- Wood or composite material for the sill
- Sealant or caulk to ensure a watertight finish
- Paint or varnish to protect the new sill from the elements
Having everything ready before you start avoids delays and ensures a more efficient replacement process.
🪟 How to Replace a Window Sill in 7 Steps

Replacing a window sill involves several clear steps, each crucial for ensuring a successful and durable installation. Here’s a more detailed guide:
1. Remove the Old Sill
Begin by using a pry bar to carefully remove the old sill. Start at one end and gently work your way along, taking care not to apply too much pressure that could damage the surrounding frame or walls. If the sill is stuck, you might need to use a utility knife to cut through any paint or caulk sealing it in place. Once you’ve loosened it, pull it out carefully and dispose of it properly.
2. Inspect the Frame
After removing the old sill, take a close look at the window frame. Look for any signs of water damage, rot, or mold that might have developed over time. If you notice any issues, address them before moving forward; this could involve sanding down rough spots, treating wood rot, or even replacing sections of the frame if necessary. A solid frame is vital for the longevity of your new sill.
3. Cut the New Sill
Measure the window opening accurately, ideally from multiple points to ensure you have the correct dimensions. Transfer these measurements to your new sill material, which can be wood, PVC, or another suitable material. Use a saw to cut the new sill carefully, ensuring the edges are straight and smooth. If you’re using wood, consider pre-drilling holes for screws to prevent splitting.
4. Fit the New Sill
Place the newly cut sill into the opening to check for fit. It should sit flush with the window frame and not bow or shift. If it doesn’t fit perfectly, make small adjustments until it does. It’s important that the sill is level, as this will help manage water drainage and prevent future moisture problems.
5. Secure the Sill
Once you’re satisfied with the fit, it’s time to secure the sill. Use galvanized nails or screws to fasten it firmly in place, ensuring that each fastener is driven into the frame for stability. Be mindful to space the fasteners evenly to distribute the load and help keep the sill secure over time.
6. Seal the Edges
To prevent moisture from seeping in, apply a bead of high-quality caulk around the edges of the new sill where it meets the frame. This will create a watertight seal that protects against rain and humidity. Smooth the caulk with your finger or a caulking tool for a neat finish, ensuring there are no gaps where water could enter.
7. Finish with Paint
Finally, give your new sill a protective finish. Whether you choose paint or varnish, make sure it matches your existing decor for a cohesive look. This step not only enhances the appearance but also provides an additional layer of protection against the elements. Allow adequate drying time before using the window to ensure everything sets properly.
💡 Maintenance Tips for Longevity
Once your new sill is installed, regular maintenance can extend its life significantly. Consider the following tips:
- Inspect the sill annually for signs of wear or moisture intrusion, especially after severe weather.
- Reapply sealant or caulk as needed to maintain a watertight seal.
- For wooden sills, repaint or varnish every few years to protect against the elements.
Keeping your window sills in good condition not only extends their life but also helps maintain your home’s energy efficiency.
Common Mistakes to Avoid
Avoiding common pitfalls can ensure a successful window sill replacement. Consider these key points:
- Don’t rush the preparation stage; ensure the frame is free from damage and debris before fitting the new sill.
- Neglecting to seal edges properly can lead to moisture ingress, causing significant damage over time.
- Avoid skimping on materials; choosing the cheapest option might save money initially but can lead to higher costs due to frequent repairs or replacements.
Quality materials and workmanship pay off in longevity and performance.
🙌 Transform Your Home with Louisville Window Company
Replacing a window sill may seem daunting, but with the right guidance, it’s entirely manageable. Well-maintained window sills protect your home from the elements, enhance its beauty, and increase its value. When it comes to expert advice and reliable service, Louisville Window Company is the team you can trust. Our commitment to quality and customer satisfaction makes us the go-to choice for all your window needs. Reach out today for a consultation and discover how we can help you maintain a beautiful, energy-efficient home.